 My Account
During the internship activities of the photography training class, many students were not sure how to use the “M-Mode manual mode” to shoot in the shooting of flowing water or night scenes. This is also a technique that is difficult for beginners to learn photography. Let’s go together now. Take a look at the simple steps and small tips, let you easily use manual mode to shoot!
When will I use “M-Mode Manual Mode” to shoot?
Usually in training classes, novices are advised to make good use of the “A/Av-Mode” on the camera (aperture priority), set the aperture (control depth of field and amount of light) and ISO, and the camera will provide the shutter value according to the built-in light meter. This mode It is also suitable for most shootings, but in some cases we need to decide the aperture and shutter by ourselves to achieve a specific effect, then we have to use the “M-Mode manual mode” to shoot. It’s like shooting night scenes, running water, flashing portraits, etc.
Steps for shooting with “M-Mode manual mode”
Novice photographers should quickly learn to use “M-Mode Manual Mode”, we can follow the steps below (take night scenes as an example):
- To start with
Turn the camera to “M-Mode manual mode” - Observe the environment and decide whether the depth of field is important or the shutter is important
If you are shooting night scenes with flowing water, we generally choose to use a slow shutter of more than 10 seconds to make silky flowing water. Assuming that the shutter is set to 10″, the aperture will be reduced (if it is set to f/10), ISO lowered (assumed to be ISO200) - Take a look at the light meter on the camera for a reference
In most cameras such as Canon and Nikon, in the M-Mode manual mode, the metering strip used to add or subtract EV will automatically move to indicate an exposure reference. We can fine-tune the aperture, shutter and ISO before shooting. Move the mark to the middle (that is, 0EV)
Note: The camera’s built-in light meter will be calibrated according to the metering mode you choose, and the whole area will be metered for one segment. - Take a picture after setting the aperture, shutter and ISO
I took a test shot with M-Mode (f/16 1/50sec ISO200), and found that the sky was overexposed and there was no gradation, the ground was dark due to the large light difference, and the flowing water did not look like silk - To see if the photo matches the desired exposure
We can use the “reverse/highlight” in the inspection photos to test whether there is overexposure, or refer to the Histogram. However, the Histogram cannot be trusted in this extreme environment and can only be used as a reference. - Fine-tune aperture, shutter, and ISO for final shooting
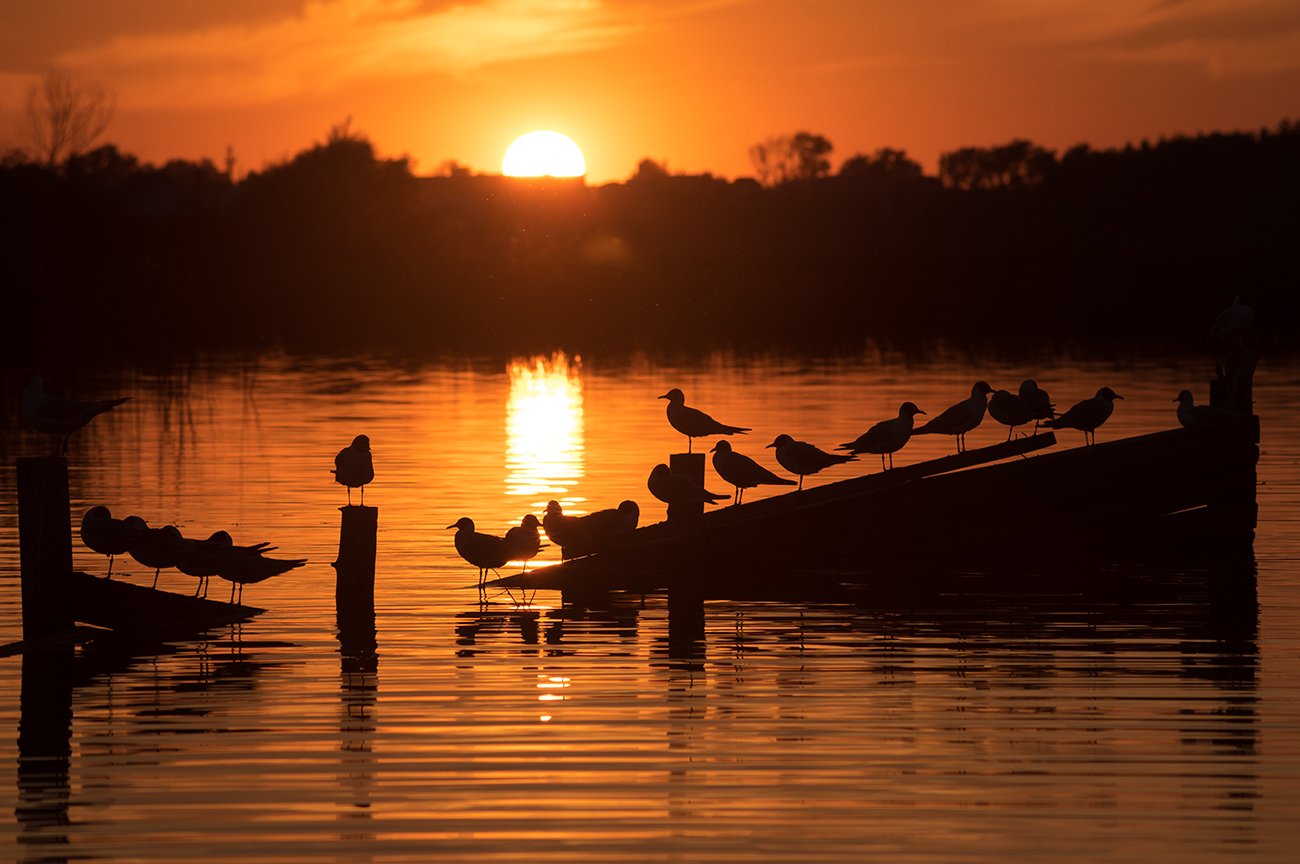
Focal length 40mm f/9 1/1000 sec ISO 100
How to take above photo?
1. Be patient and wait for the sunset
Because we will be facing the sun to shoot, the light difference between the sky and the ground will be large. At this time, we have to wait for the sun to set relatively low before shooting (except for shooting the salted egg king) in order to reduce the light difference.
2. Add a gradient gray filter (GND)
To further reduce the light difference and reproduce the details of objects on the ground, we can add a Graduated neutral-density filter (GND).
3. Add ND filter
In addition to the above gradient gray filter, the author also added a light reduction filter to allow the camera to take a 30-second exposure to make the water smooth, and the photo would be overexposed if it is not used.
4. Adjust the white balance
Adjust the white balance to a high K number, which can make the picture reddish, but it can also be the other way round, bringing out the warmth of the sunset, purely personal preference
Written by Collin Smith @ remotes.works Holborn London


