 My Account
DSLRs have light meters built into them that automatically measures the reflected light and determines what the best exposure for your images. There are various metering modes that your camera will use to determine this optimal
exposure; and these are
- Evaluative metering
- Center-weighted metering
- Spot metering.
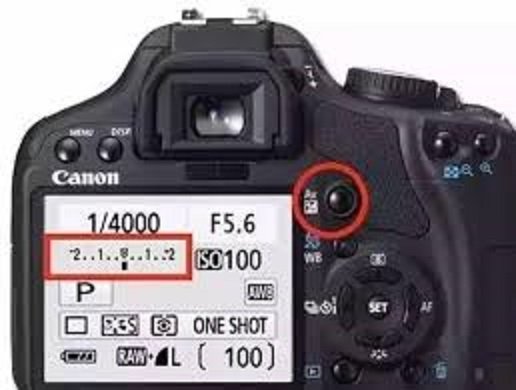
And there are other variations that different cameras do offer, but we are just cover these main three metering that most cameras have. But first you need to be in manual mode. To study photography seriously, we should give up using Auto-mode, so it is necessary to manually adjust the metering system in the camera. The light meter is useful when you are doing other modes such as aperture priority, shutter priority, or program mode. However, you almost always want to retain control over all your ,settings in video for stylistic reasons. So you’ll need to be in manual mode. So, taking a look inside of the viewfinder, you can see the metering scale displayed by a “0” in the middle with bars going left and right to a “1” and “2” on each side of the “0”. Each of these numbers represents a “spot of light” and the metering scale is typically based on one-third increments of these spot of light. So, if you point your camera at a bright area, the bars will go to the “+” side indicating that there is too much light for the current exposure setting. If you point your camera at a very dark area, the bars will go to the “-” side indicating that there is not enough light. So you would then have to change your camera settings in aperture, shutter speed, or ISO accordingly in order to achieve the “0” which is the optimal exposure based on your camera meter. And these camera meters work great when scenes are evenly lit However it can become problematic and challenging for your meter to determine proper exposure when there is various objects with different light levels and intensities in your image. So for example, looking at someone with the sun behind them, there will be very large differences in brightness between your subject and the sun and the picture will look very different based on if you’re exposing for the subject or for the background. And this is where the various types of metering come into play.
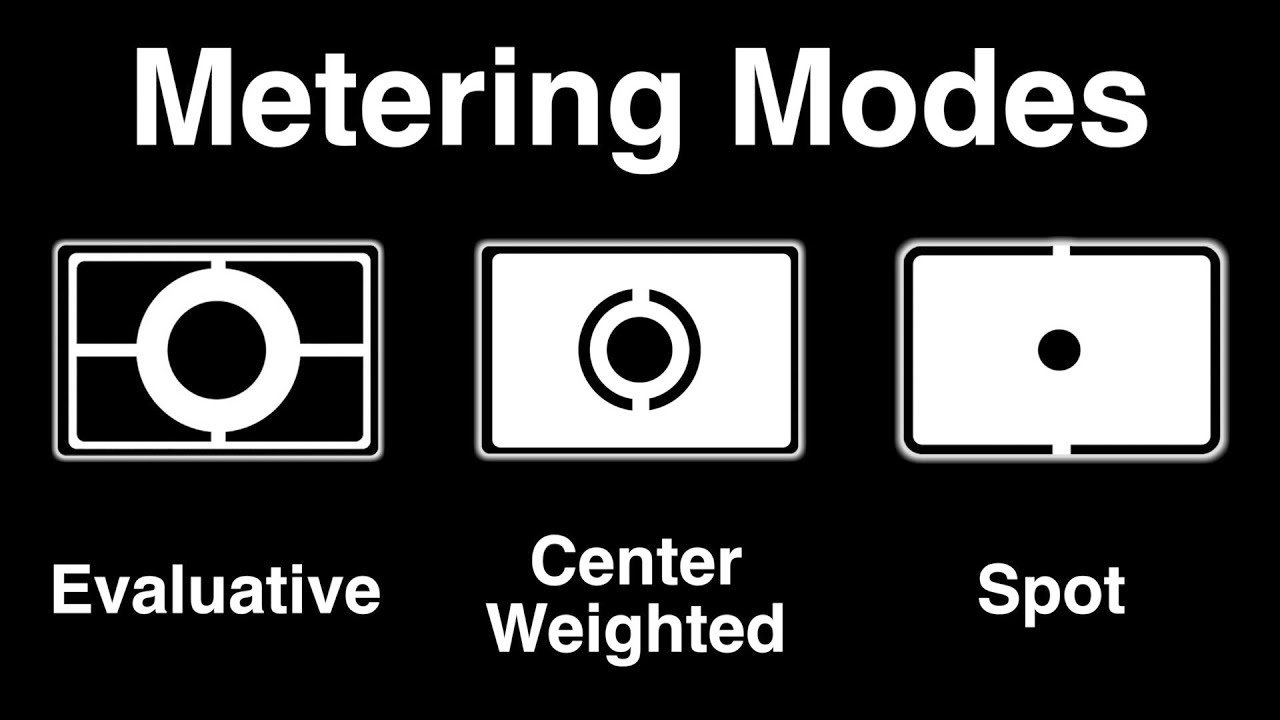
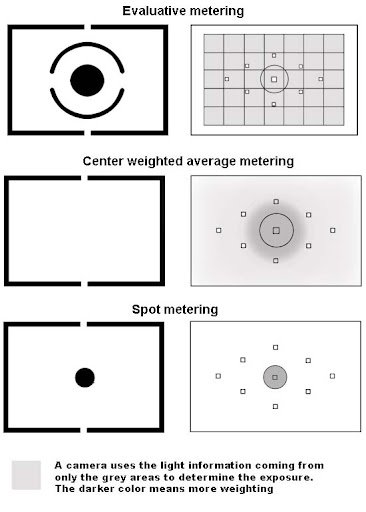
Evaluative metering
Evaluative metering is the default mode on most DSLRs, and this is also known as matrix metering or multi-metering depending on your camera’s manufacturer. But they all work in the same way by dividing the frame up into multiple zones and then analyzing them for light and dark tones. And one of the key factors that your metering system takes into account during evaluative metering is where your focus point is set to. So after looking at all these different zones and figuring out an average among them, your camera looks at where your focus point is set and marks that zone as more important than the rest. Evaluative metering works well with scenes that are evenly lit, and you can typically use it as a “go-to” method for getting your shots. If you leave your camera in this mode, you’ll find out pretty quickly how your exposures will turn out in a variety of settings.
Center-weighted metering
Next up is center-weighted metering, and this mode measures the light in the center of your frame with its surroundings and ignores the corners. Compared with evaluative metering, center-weighted metering does not take into account where your focus point is set but rather only evaluates that middle area of your image. And on many higher-end DSLRs you can actually change the diameter of your center-weighted area. A good use for this mode would be a scene where you want your primary subject to be correctly exposed while the rest of the image can generally be ignored for proper exposure.
Spot metering
And the final mode is spot metering, which will give you the most precise and accurate exposure control over your image because it only evaluate the light around the point you choose while ignoring everything else. If you were getting a shot of a person with sun behind them but they occupied a small part of the frame, it’s best to use the spot metering mode because when your subjects don’t take up much of the space, using evaluative or center-weighted metering would most likely result in a silhouette.
Another option that some cameras offer to help with determining exposure are zebras, which are hashed lines that show up in any part of your scene that is overexposed. I find this mode very useful when I’m shooting weddings and don’t have time to be switching back and forth between all my metering modes. I’ll just click on the zebras, and then I can see which part of the frame is overexposed to make sure that I’m not overexposing. So try out the different types of metering in various settings, and see which ones work best for you in different circumstances.
Different metering modes in different environments are just convenient for photographers to get approximate exposure, and the camera’s metering system will also be affected by the external environment (such as snow, black clothes) and we may make mistakes in such situation. So we often need to do it manually with exposure compensation. Photography is an art, and there is no “absolutely correct” exposure, so you can use the above metering modes to test in different environments to see what the effect will be. Try and practice, one day you will find the usefulness of each metering mode.
Written by Collin Smith @ remotes.works Holborn London


OK