 My Account
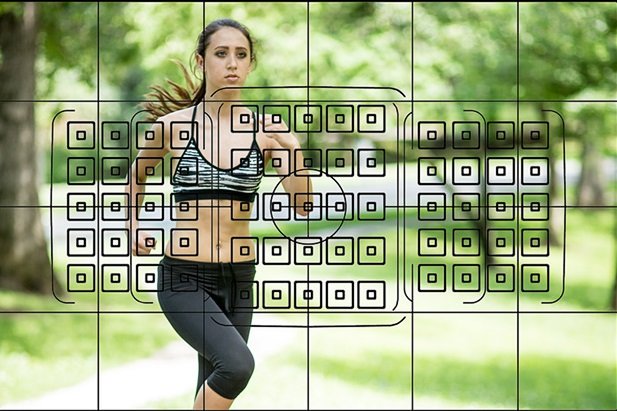
For novice or amateur photographers, metering often seems difficult to master, and the camera also has many different metering modes built-in, so when should you use which metering mode to achieve the desired effect? Now let me share how to use “matrix metering” to cope with 99% of the daily environment! After you finish your studies, you can take pictures anytime you want without changing the metering mode.
Let me talk about what the metering mode is
As I mentioned before most digital cameras have three light metering mode
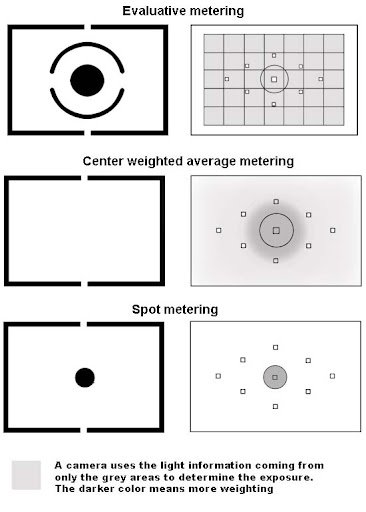
- Evaluative metering/Matrix metering
- Center-weighted metering
- Spot metering.
The difference between them is actually only in the selection of the range used to calculate the luminosity. Matrix metering will select the area of the whole photo for calculation. Spot metering will use the focus point or a very small area in the middle to meter, while the center-weighted metering will be convenient. Almost between the two.
Good partner for matrix metering: exposure compensation button (+/-EV)
When using matrix metering, there is a very useful and seamless function in the camera, which is the exposure compensation button (+/-EV)! The exposure compensation button allows you to increase or decrease the exposure value by yourself. One thing to note is that the adjustment button is not a post-production method like Photoshop to make changes, but directly increase or decrease the aperture, shutter or ISO to achieve the change in exposure. , So it’s more worth using than post-modification.
To use the exposure compensation button, just press the button and click to add and subtract. For details, please read the camera manual
Tips when using matrix metering
- Normal light-receiving environment
In the normal light-receiving environment, that is, when shooting under the condition of not very bright or very dark, modern digital cameras have been able to measure the light very accurately. Try to maintain a balance between the light level and the dark level of the photo, and set the aperture, The shutter and ISO values. Therefore, whether you are shooting outdoors or indoors, as long as you are not shooting under extreme light sources, you can trust the ability of matrix metering and just shoot directly!
- In backlit/backlit scenes
When you take a backlit/backlit photo, your subject will face away from the light source and the lens will face the light source. At this time, the camera’s matrix metering will think that there are many bright spots in the photo (assuming your subject does not cover the entire screen). Therefore, if you dim the photo as a whole to achieve balance, the subject will become underexposed or become a silhouette. Of course, it is very convenient if the final goal is to shoot a silhouette, otherwise you have to greatly increase the exposure compensation (sometimes +3EV) or use the flash to fill the light for the subject!
- When shooting black/white scenes
When black/white things occupies a large part of the photo, matrix metering will make mistakes, thinking that the environment is very dark/very light and get the wrong settings for overexposure and underexposure, so we have to respond to our experience before pressing the shutter -/+ EV to correct the lack of matrix metering. There is a formula that is easy to remember, you must know:
When encounter dark then (-EV), when encounter light then (+EV)
- When shooting portraits
Normally, the face of the portrait should have the correct exposure when taking portrait photos, so pay more attention to the exposure. When you are using matrix metering, you must first look at the light around the person for +/-EV compensation
Front light — “face has normal and sufficient light”, “no need to adjust EV”
Backlight/backlight — “Shooting silhouette”, “No need to adjust, EV can be reduced if necessary”
Backlight/Backlight — “The subject should be exposed normally”, “+2 to +3EV”
Large light source — “There is a chance that the metering error makes the photo too dark”, “+EV”

5. When facing the sun/light source
When your photo contains the sun or a strong light source, unless you are using a wide-angle lens and the light source occupies only a small part of the photo, the camera will lower the exposure and make the photo darker. At this time, you may wish to have +0.7 or +1.3EV (adjusted according to the situation) before shooting to restore the photo to normal exposure.
6. When shooting night scenes
When shooting night scenes, if the photo is full of light sources (such as neon lights, Christmas lights, etc.), you need to increase the EV, otherwise the photos will be dark; but if the night is the majority, you need to reduce EV, so as not to overexpose the black areas and turn gray.Of course, the matrix metering at this time is just a reference, it is best to use the manual mode to fully grasp the exposure value!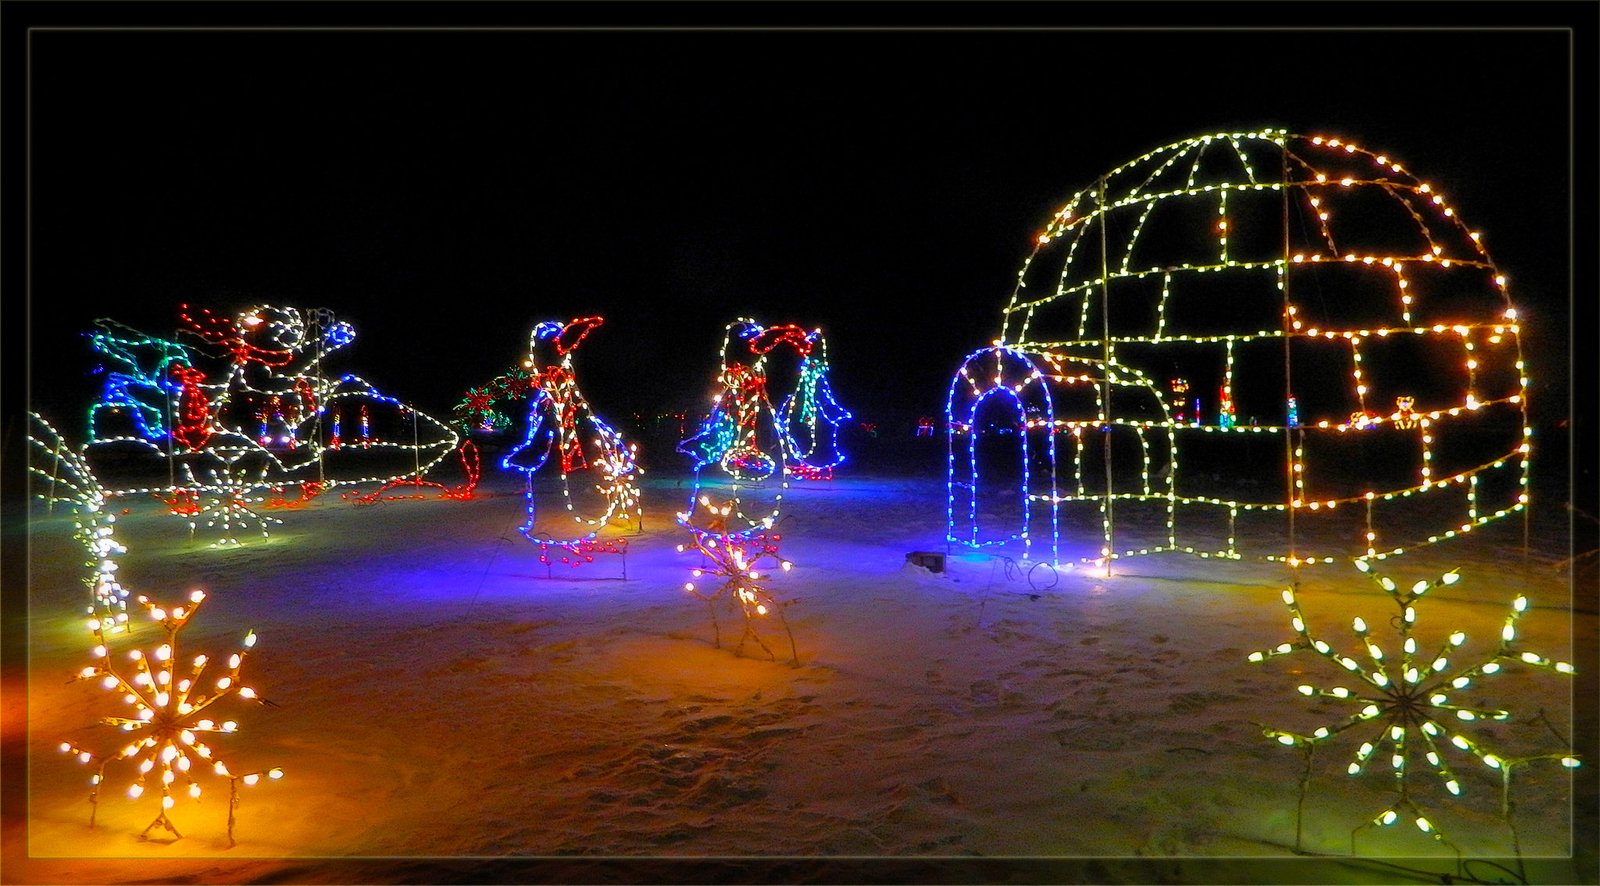
I am a heavy user of matrix metering. Basically, in addition to shooting concerts or when shooting in manual mode, matrix metering can also allow me to smoothly take photos with normal exposure. Therefore, as long as I understand the use of matrix metering in different environments Method, you can avoid the trouble of changing the metering mode!
Written by Collin Smith @ remotes.works Holborn London


